Wordpress Plugin
WordPress is a free and open-source content management system. By using the Billsby WordPress plugin, you can easily integrate Billsby's subscription billing into your site so that we can handle the technical stuff for you. This includes the checkout and account management pages, recurring billing, content locking and compliance.
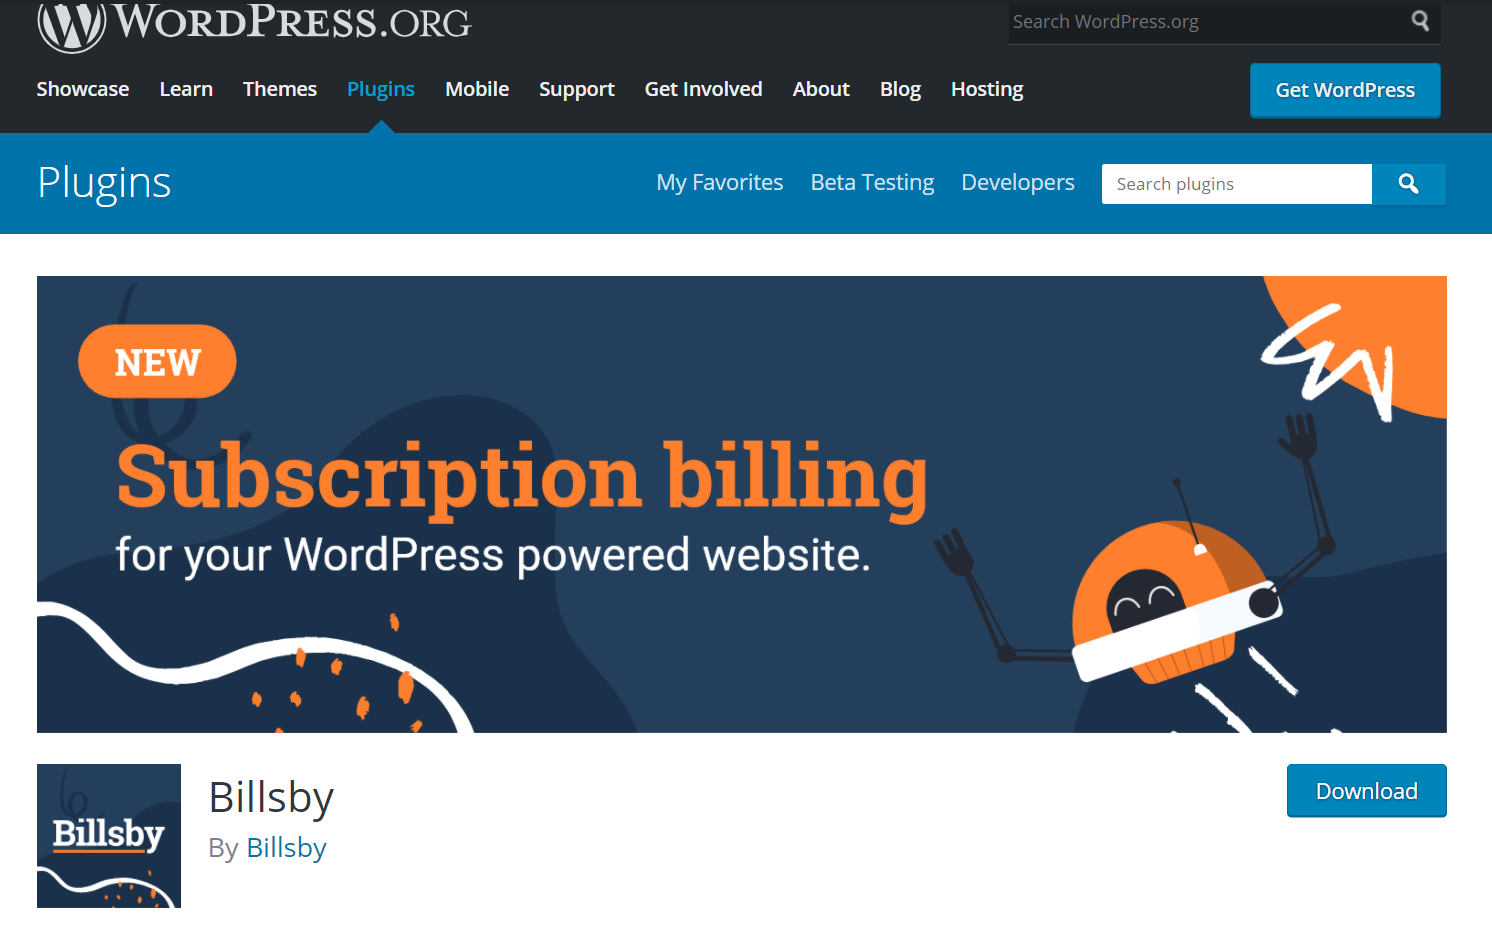
To download the plugin, first head to the WordPress directory. Then, press the 'Download' button. Please note that you will need a Billsby account to proceed with setting up the plugin.
Installation
To begin the process of setting up the Billsby plugin, you will first need to install the plugin to your WordPress website.
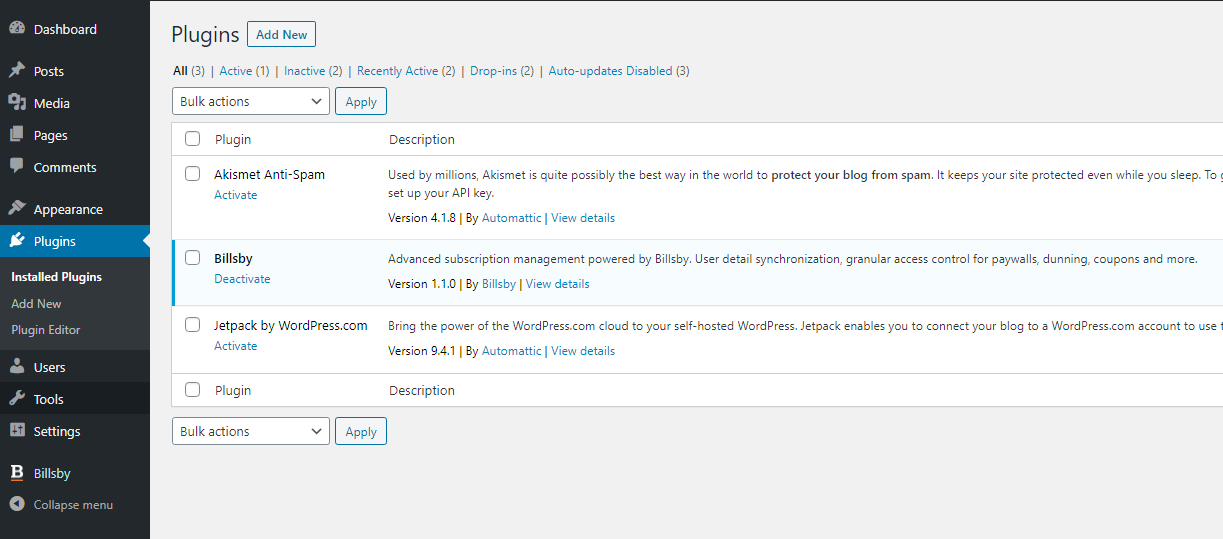
To do this, navigate to the 'Plugins' tab on your WordPress site, then click on the 'Add New' button.
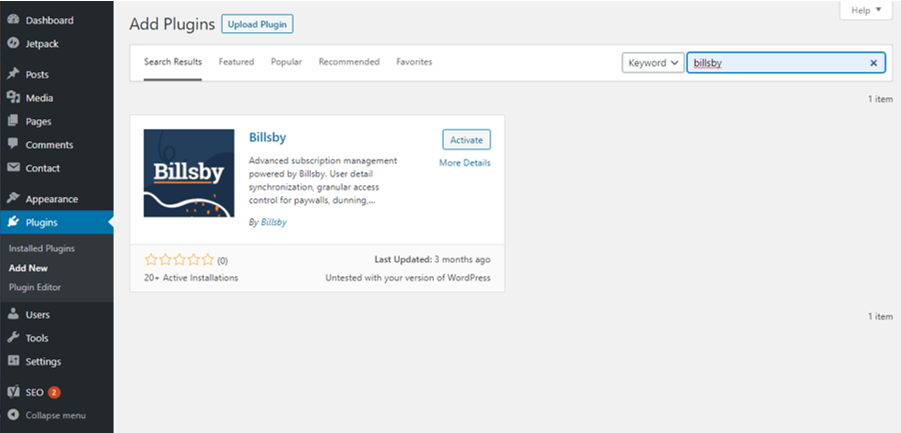
This will open up a modal displaying a list of available plugins. Use the search bar in the top right of the screen to search for 'Billsby'. Then, click on the blue 'Activate' button next to the Billsby plugin.
After you click the 'Activate' button, a 'Billsby' tab will appear at the bottom of the menu on the left side of the screen. Click on the tab, and this will open up a new modal asking you to input your company ID and API key.
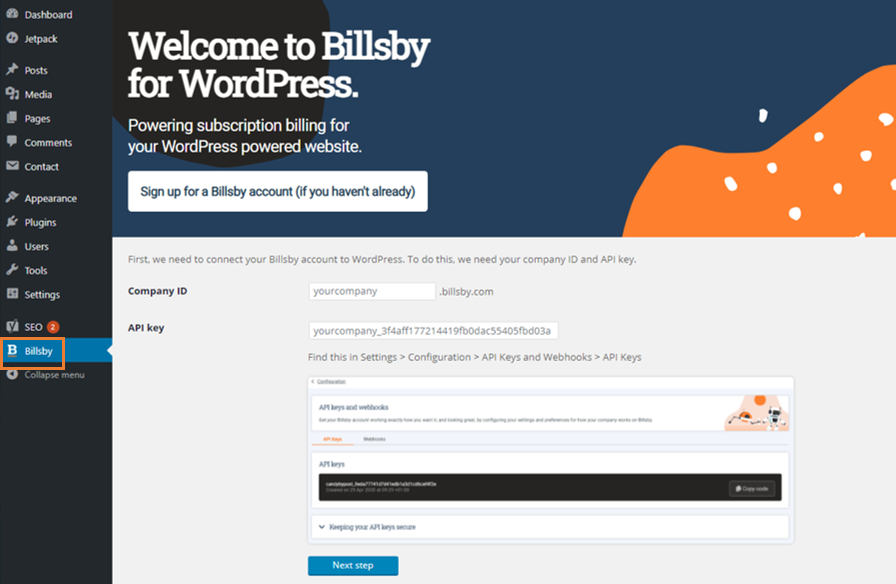
Your company ID is your company name as it appears in the URL of your Billsby account e.g. (affordableapparel.billsby.com).
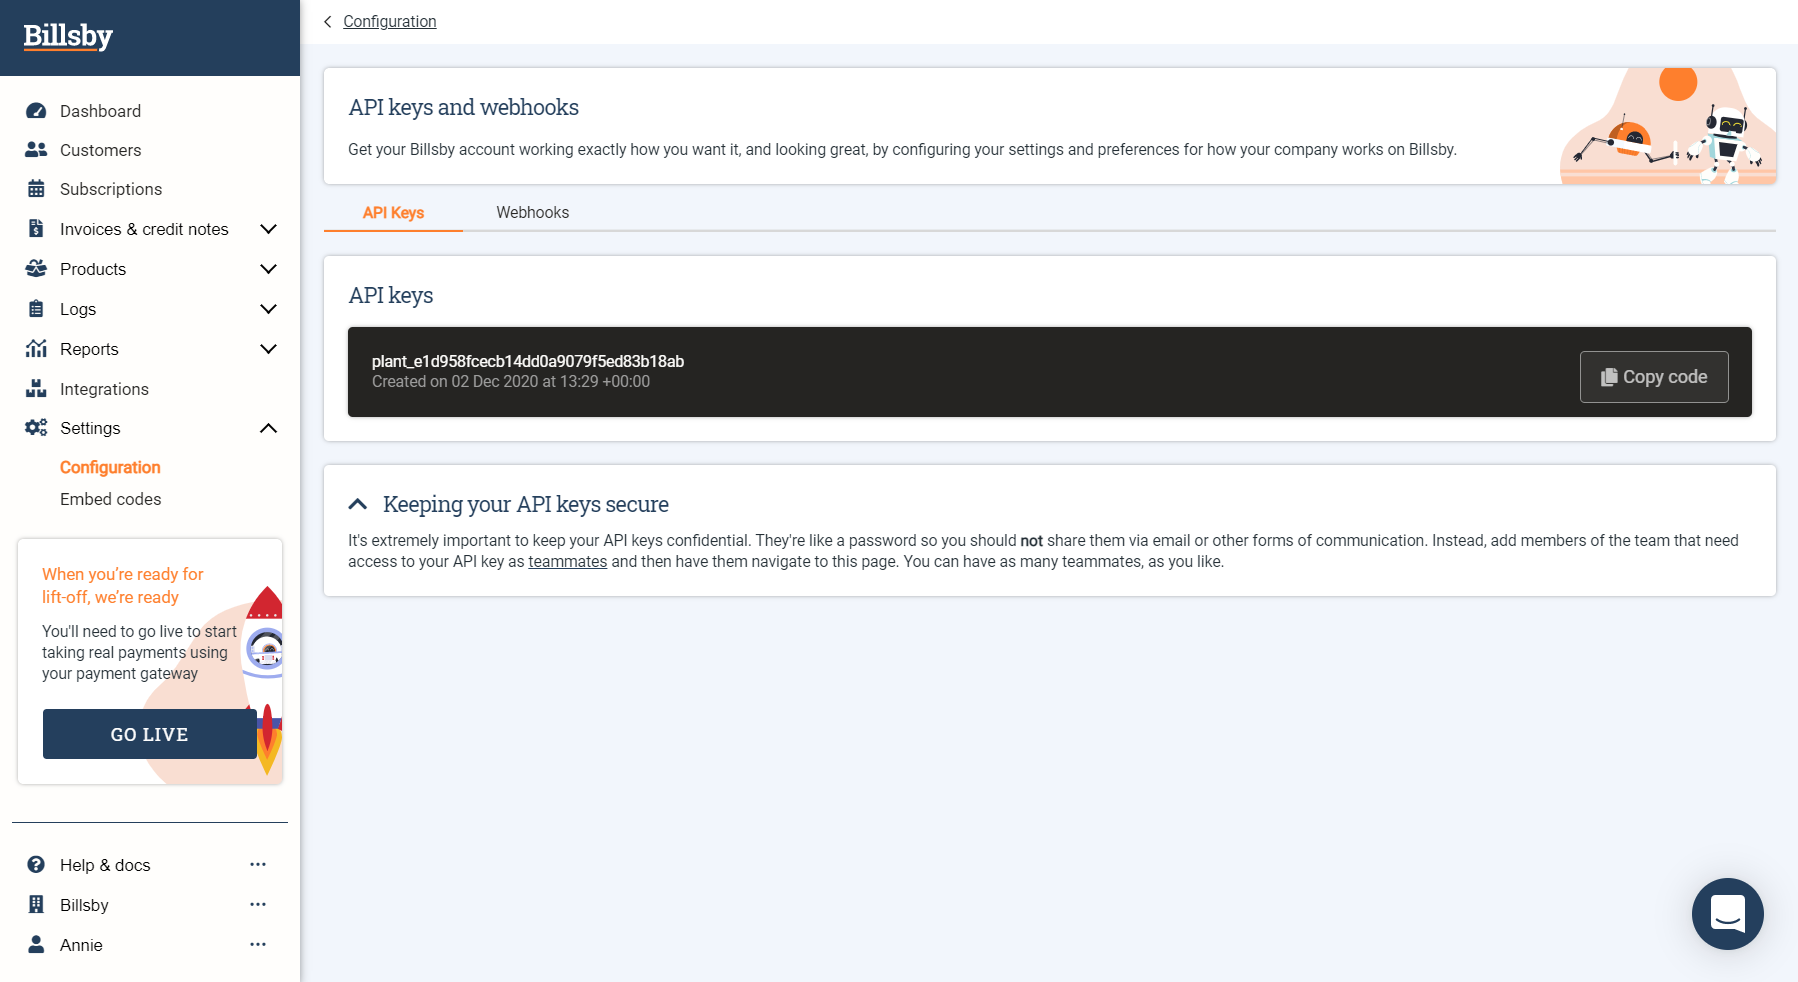
Your API key can be found on your Billsby account dashboard by clicking Settings > Configuration > API > API Key and Webhooks > API Keys.
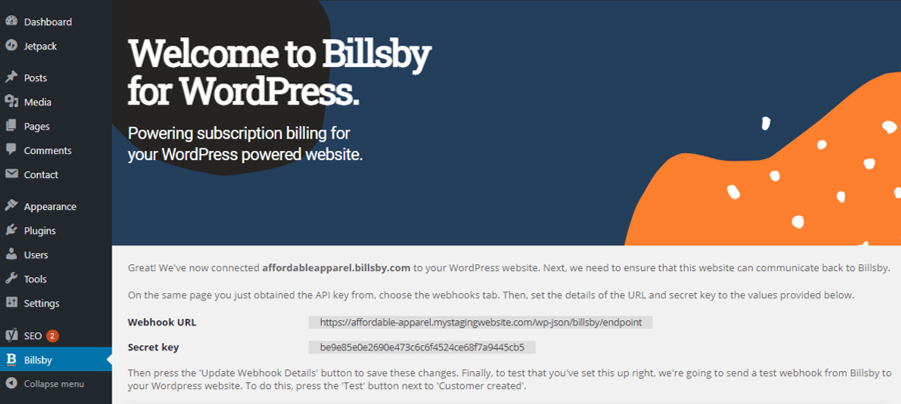
After you input your company ID and API key, click the button that will take you to the 'Next Step'. Here, you will be asked to set the values of the URL and secret key in your Billsby account to the values that are provided.
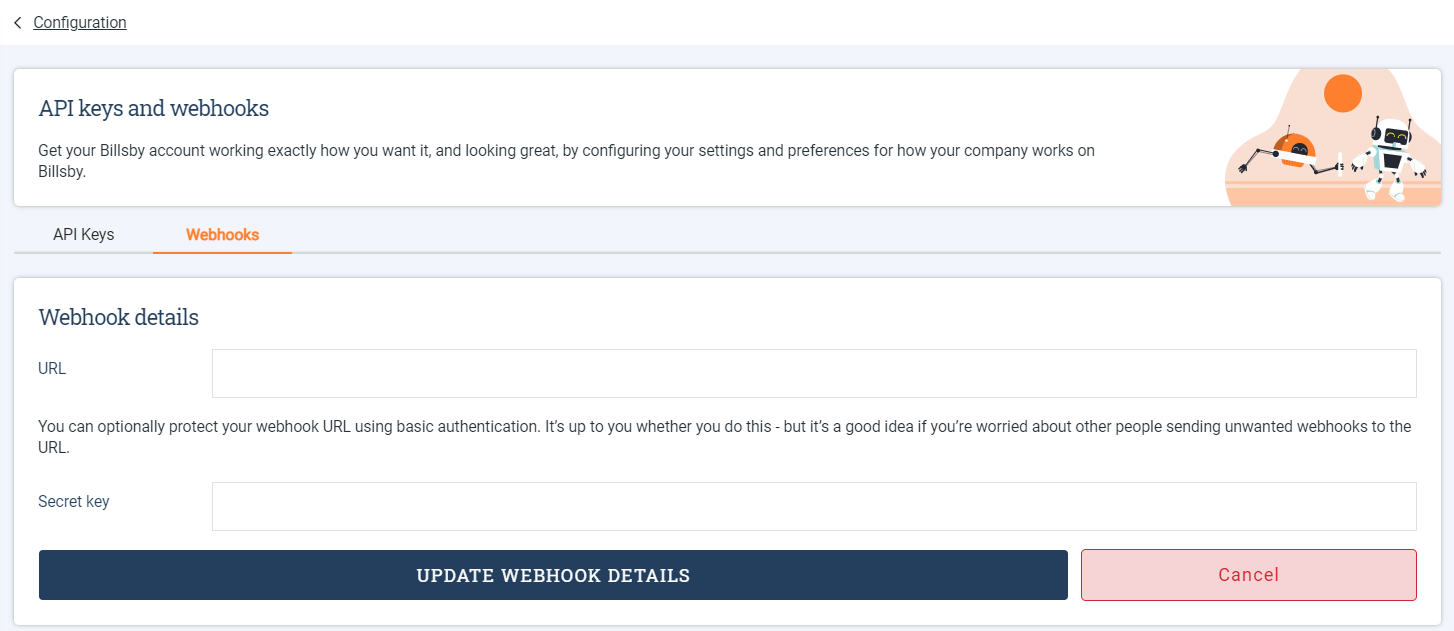
To do this, navigate to the Billsby dashboard, head to Settings > Configuration > API > API Keys and Webhooks > Webhooks, then click 'Update Webhook details' to save these changes.
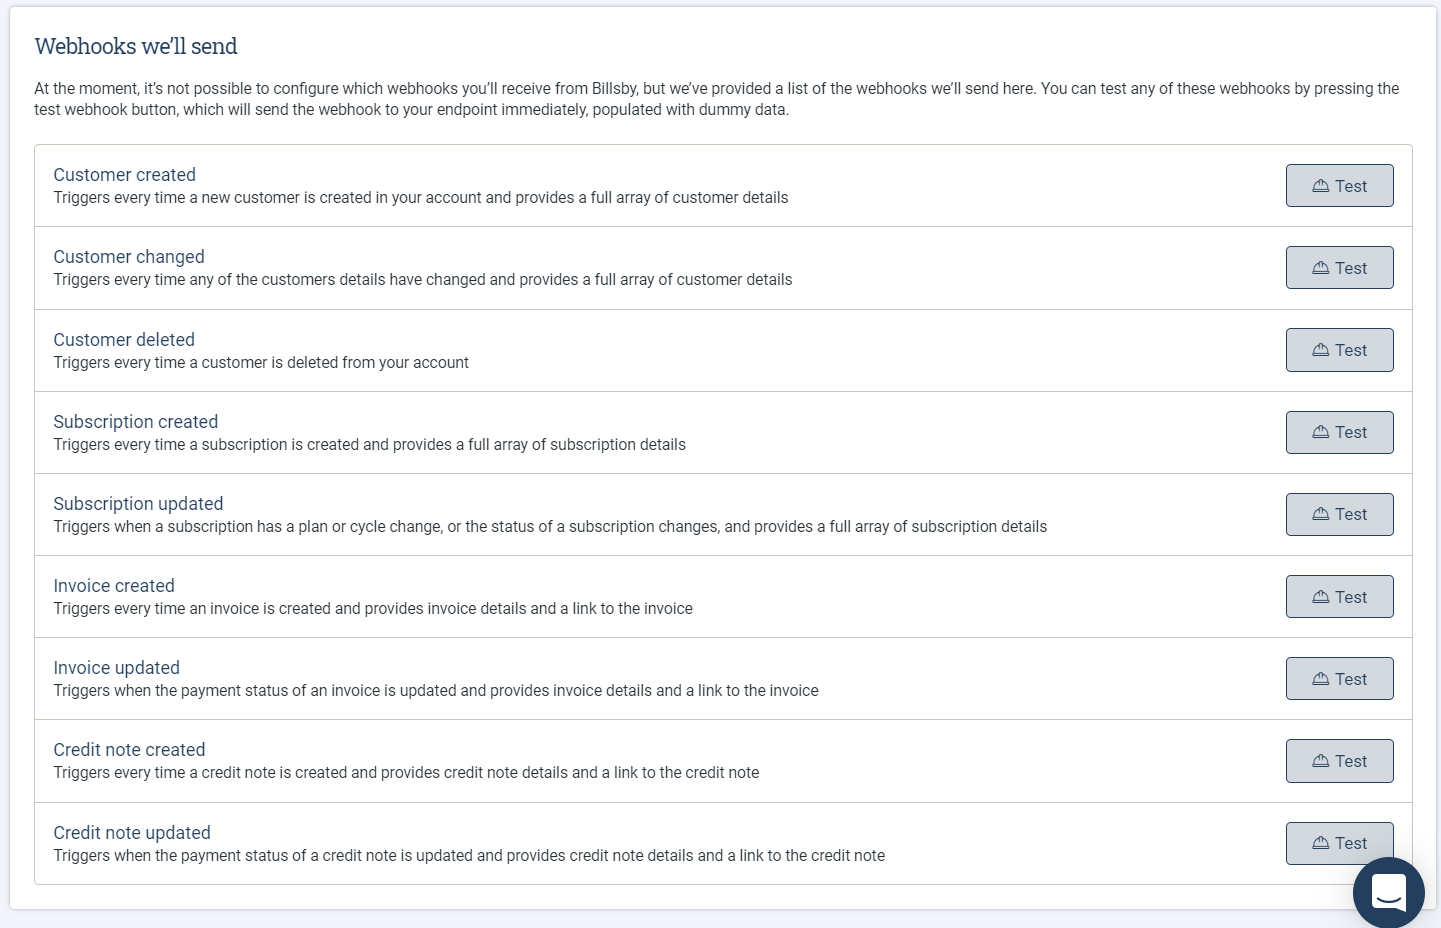
Below the 'Update Webhook Details' button there are numerous webhooks that you can test in order to ensure the successful linking of your Billsby account to the WordPress Billsby plugin.
To do this, simply press the 'Test' button next to 'Customer Created', for example.
Once you have successfully tested the webhooks, return to the WordPress site and click on the 'Next Step' button. This will take you to a new screen where you can decide which of Billsby's features you would like to use in your WordPress site.

These features include the ability to embed ‘Subscribe’ and ‘Manage Account’ buttons; the option to synchronize the Billsby and WordPress accounts of customers, meaning customers will be required to have a WordPress account in order to manage or create a subscription; also, this includes the ability to limit access to certain content on your site, for example, to customers with specific subscriptions, including content limited based on feature tags.
Finally, once you have selected the features you want, click on the 'Complete Billsby Setup' button. Remember, you can change these options at any time. This will conclude the process of installing and setting-up the Billsby WordPress plugin.
Subscribe buttons
To access the shortcode which enables you to easily embed buttons that link to the Billsby subscription portal, navigate to the Billsby plugin tab and click on the blue 'Buttons' dialogue box.

This will take you to a screen where you can manage the 'Subscribe' and 'Manage Account' buttons that will appear on your page.
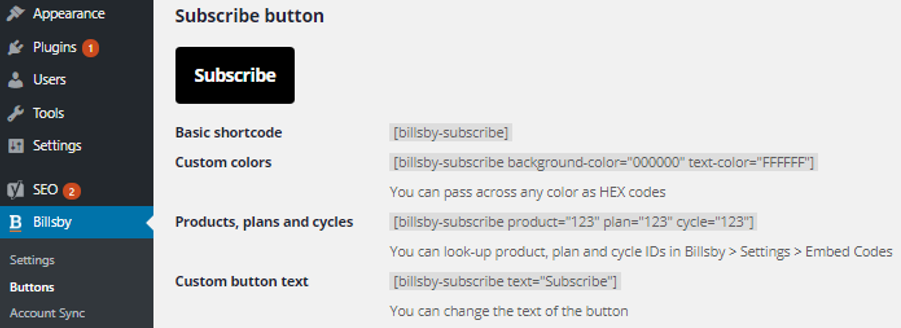
Below the black subscribe button are four pieces of shortcode:
-
[billsby-subscribe] – This piece of shortcode can be embedded onto a WordPress page in order to add a ‘Subscribe’ button that links to a Billsby portal where customers can subscribe to any of your product plans.
-
[billsby-subscribe background-color=”000000” text-color=”FFFFFF”] – This shortcode embeds the ‘Subscribe’ button, while also allowing you to customise its background and text colour using HEX codes. The HEX codes need to be inputted instead of the ‘0’s and ‘F’s in the shortcode, which can be found here.
-
[billsby-subscribe product=”123 plan=”123” cycle=”123”] – This shortcode embeds the 'Subscribe' button but also makes it so that customers can be immediately directed to a specific product, plan or cycle. This is achieved by entering the product, plan or cycle ID into the shortcode within their respective places. The ID numbers can be found in your Billsby account by navigating to Settings > Embed codes.
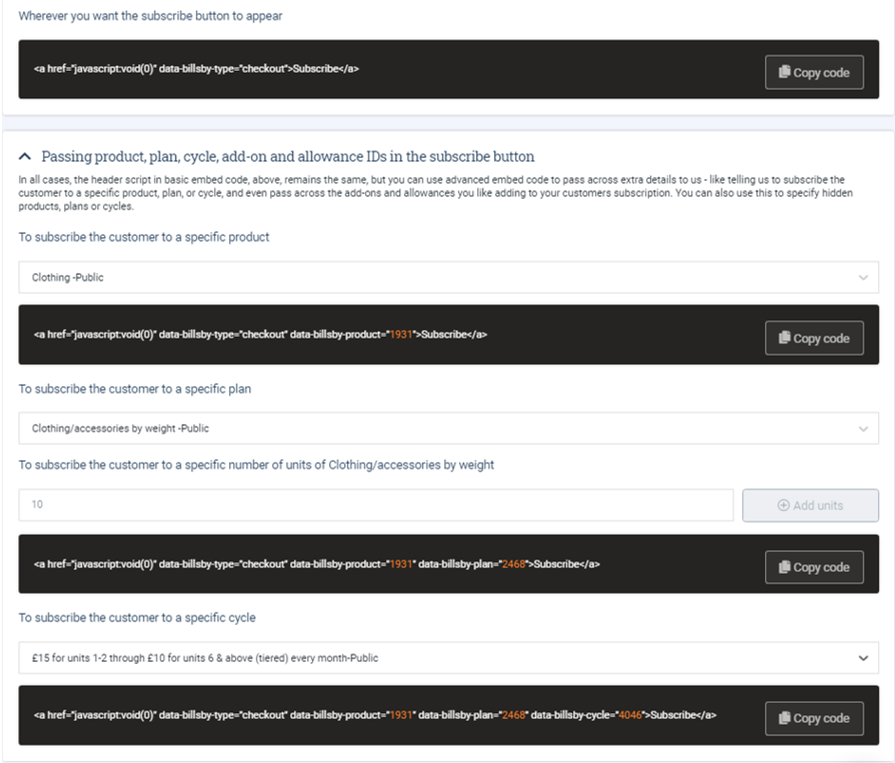
ID numbers, in orange.
- [billsby-subscribe text=”Subscribe”] – This piece of shortcode allows you embed a 'Subscribe' button onto a page. To change the button's label from 'Subscribe' to something more fitting to your brand, simply replace the text that is embedded within the quotation marks.
How to use the embed code
To use the embed code, locate the shortcode you wish to use first. Then, manually copy the text and head to the 'Edit Page' section of the WordPress page(s) you want to add the 'Subscribe' button to. Here, you can paste the shortcode wherever you would like the button to appear.
In the example below, each of the shortcodes are included to give you an idea of what they should look like whilst you're editing a page. Since each piece of shortcode adds a new 'Subscribe' button, in this example, you would understandably have four 'Subscribe' buttons appear on your WordPress site.
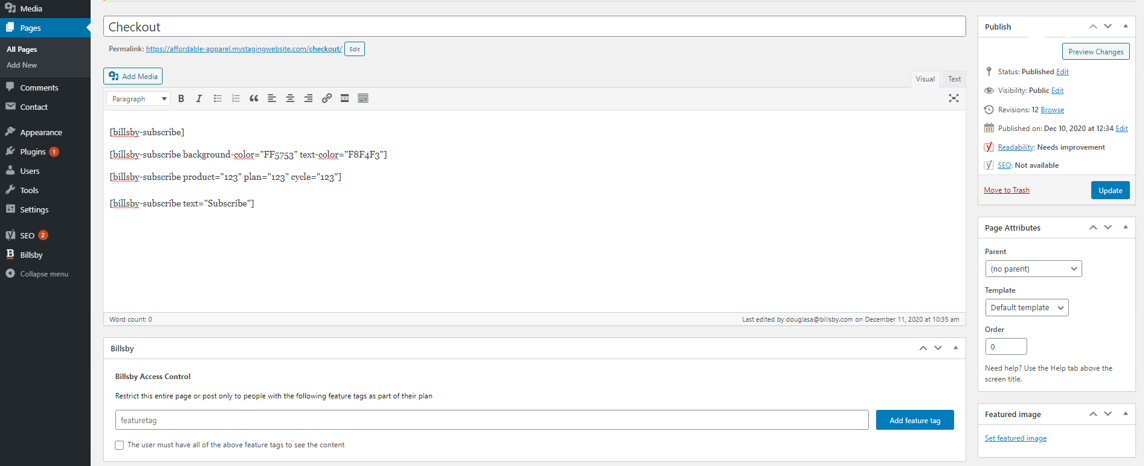
Once you have added your shortcode to the desired page, make sure to click the 'Update' button located on the right-hand side of the screen to save any changes you make.
To preview any changes, simply click the 'Preview Changes' button.
Manage account button
To access the shortcode which enables you to easily embed buttons that link to the Billsby account management portal, first you must click on the blue ‘Buttons’ dialogue box in the Billsby plugin menu.

This will take you to a screen where you can manage the 'Subscribe' and 'Manage Account' buttons that will appear on your page.
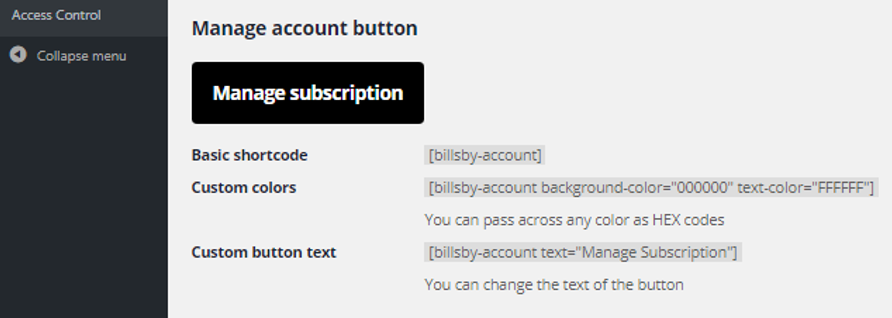
Below the black ‘Manage subscription’ button you will see three pieces of shortcode:
-
[billsby-account] – This piece of shortcode can be embedded onto a WordPress page in order to add a ‘Manage Subscription’ button. The button will open a Billsby portal where your customers can manage their account and personal details.
-
[billsby-account background-color=”000000” text-color=”FFFFFF”] – This shortcode embeds the ‘Manage Subscription’ button, whilst also allowing you to customise its background and text colour using HEX codes. The HEX codes need to be inputted instead of the ‘0’s and ‘F’s in the shortcode which can be found here.
-
[billsby-account text=”Manage Subscription”] – This piece of shortcode allows you to embed a ‘Manage Subscription’ button onto a page. To change the button's label from 'Manage Subscription' to something more fitting to your brand, simply replace the text that is embedded within the quotation marks.
These buttons are embedded in the same way as the ‘Subscribe’ buttons, shown above.
Access control
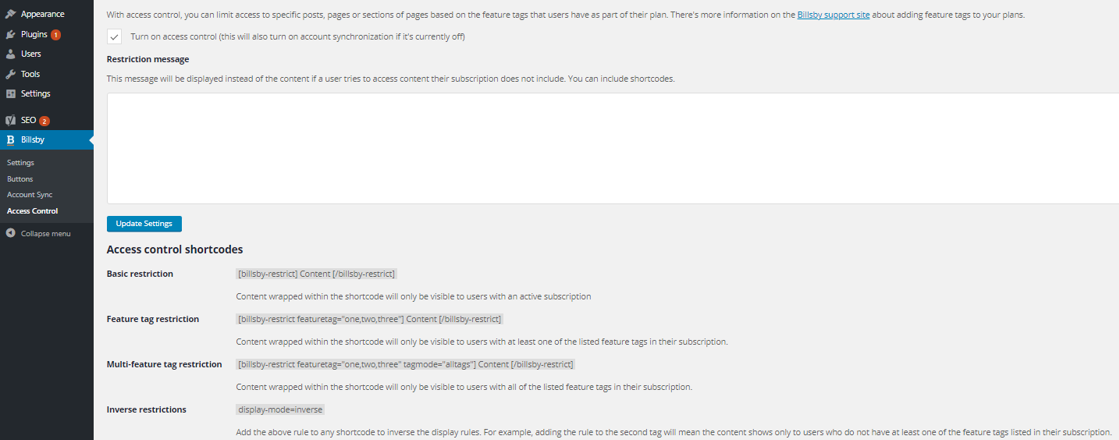
Enabling access control allows you to limit subscribers' access to specific posts, pages or areas based on the feature tags they have included in their plan.
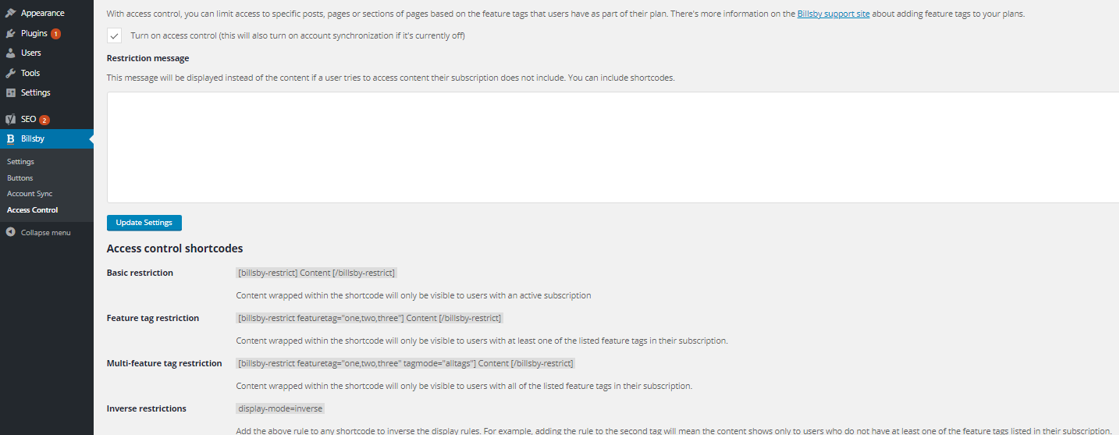
To turn on access control, navigate to the Billsby plugin tab and click on the blue 'Access Control' button. This will open a page where you can check the box that says, 'Turn On Access Control'. Turn this feature off, simply uncheck the box.
You will also be given the option to enable this feature during the initial set-up of your Billsby plugin account.
Feature Tags
Feature tags can be added to your plans to signify what aspects of a plan you want each customer to have access to. If, for example, you have multiple plans with varying access to your product, you can use feature tags to signify what features are exclusive to your more premium plans.
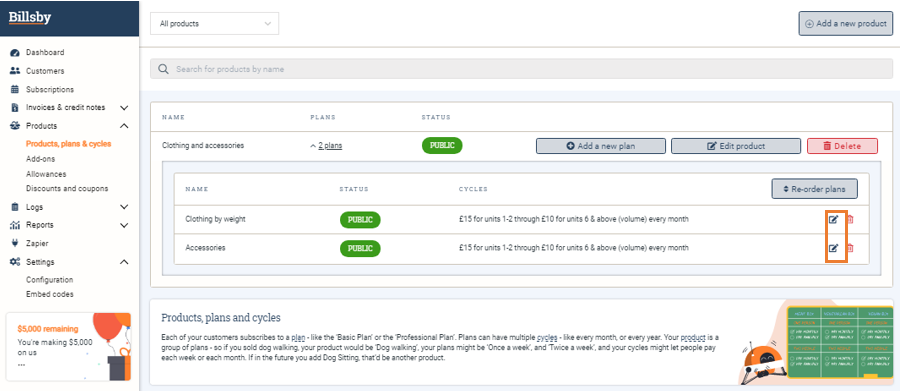
With Billsby, feature tags can be added or removed from your plans at any time. If, during a plan's creation, you add a feature tag that you later want to remove, you can do so easily by navigating to the Billsby dashboard. Next, you will need to click on Products > Products, Plans & Cycles and click on the 'Edit' button next to the plan in question.
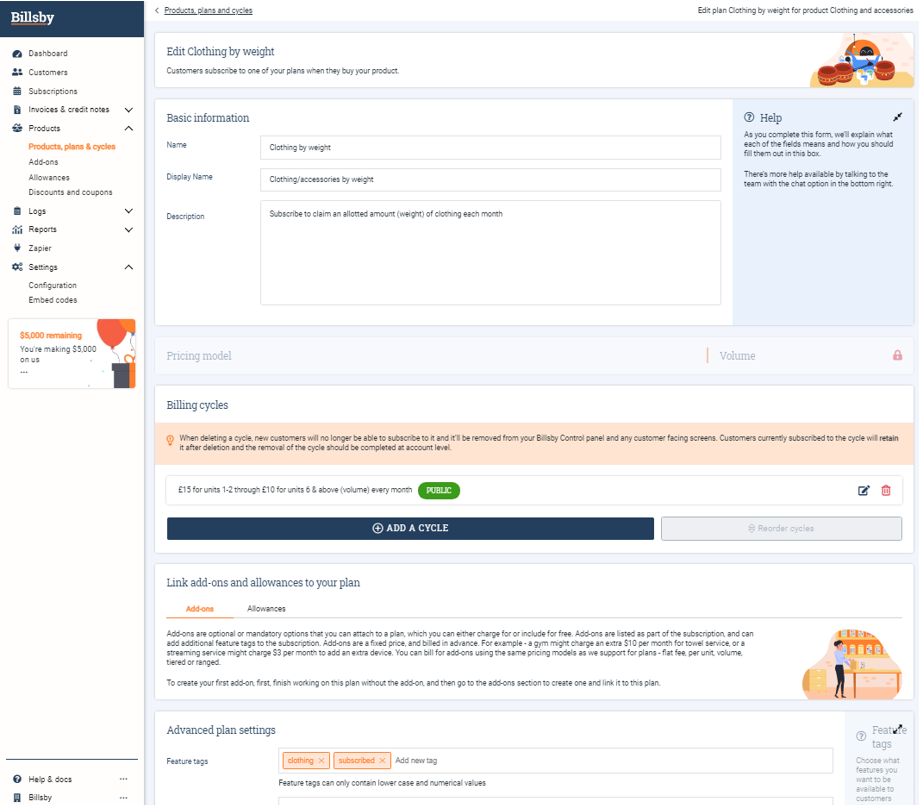
Scroll to the bottom of the page to the 'Advanced Plan Settings', and here you will find the section on 'Feature Tags' where you can add or remove the tags at will.
Feature tags can only be single words comprised of lowercase letters and numbers. To add a new feature tag, simply type it into the box and press enter.
Once you are satisfied with your feature tags, you will need to embed the access control shortcodes onto the area of the page where you want the content to be restricted.
To access these codes, navigate to the Billsby plugin tab and click on the 'Access Control' button. Scroll to the bottom of the page, past the 'Restriction Message' box and the codes will be underneath the 'Access Control Shortcodes' heading.
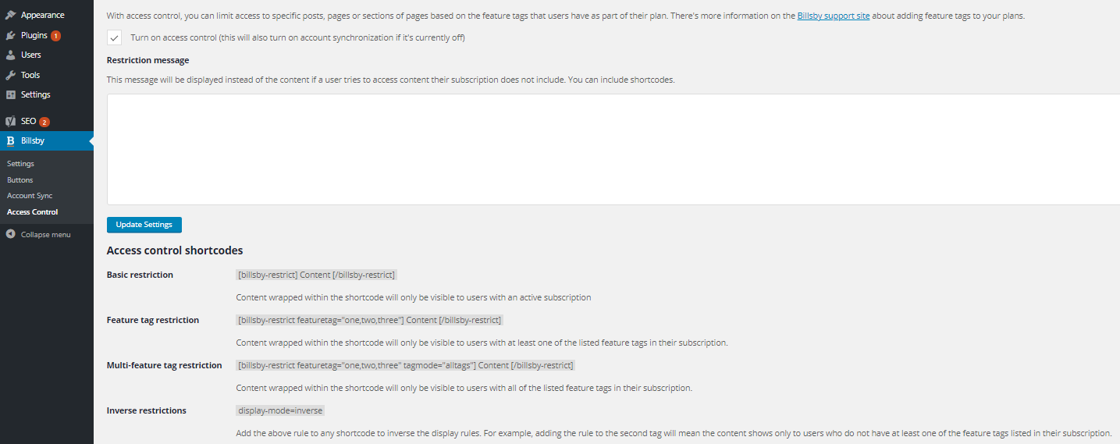
There are four pieces of shortcode that you can use on your site, which are embedded in the same way as the ‘Subscription’ and ‘Account Management’ buttons but function differently. The four shortcodes and how they function are as follows:
-
[billsby-restrict] Content [/billsby-restrict] – Anything you write between the opening and closing shortcode tags will only be visible to your customers who have an active subscription.
-
[billsby-restrict featuretag=”one,two,three”] Content [/billsby-restrict] – Any of your users with subscriptions that contain at least one of the feature tags that you add in the ‘featuretag=”…..”’ element of the shortcode will be able to see the content within the opening and closing restriction tags.
-
[billsby-restrict featuretag=”one,two,three” tagmode=”alltags”] Content [/billsby-restrict] – This piece of shortcode functions in the same way as the one above, however when this one is used, your users have to have all of the listed feature tags in their subscription in order to access the restricted content.
-
display-mode=inverse – This rule can be added to the closing tag of any of the above shortcodes and allows for the inversion of the display rules. For example, if the inverse rule is added to the second piece of shortcode in the closing tag, the content will only show up to users who do NOT have at least one of the listed feature tags in their subscription.
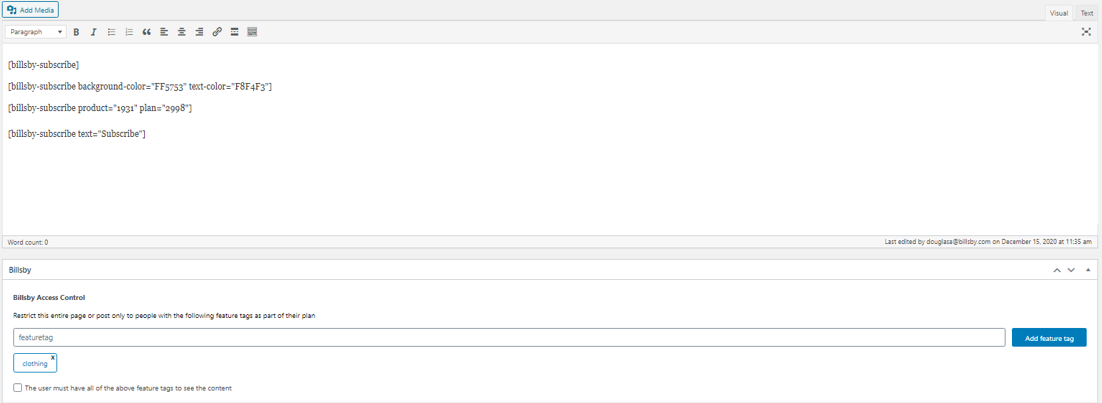
In addition to the shortcodes, you can restrict the content of an entire page by going to the page editor and typing in the required feature tags for access in the ‘Billsby Access Control’ box. Simply click the 'Add Feature Tag' button, followed by 'Update' in order to save any changes.
Likewise, you can restrict a page's content by checking the box that dictates a user must have all of the listed feature tags in order to access the page's content.
You can also add a customized message or shortcode that will be displayed to users who attempt to access content they do not have access to. This can be added in the ‘Restriction Message’ box.
Account synchronization
To access your account synchronization settings, navigate to the Billsby plugin tab and click on the 'Account Sync' button.

To activate account synchronization, simply check the box labelled 'Turn on Account Synchronization'. To deactivate this feature, simply uncheck the box.
Here, you can also specify a URL that you want logged out users to be redirected to if they try to set-up a subscription, such as the registration page.
Remember to click the 'Update Settings' button in order to save any changes you've made.

Access to Billsby
To access Billsby directly through your WordPress account, navigate to the Billsby plugin tab and click on the 'Login to Billsby button'. This will launch a new window and take you to your account on the Billsby website.

Disconnect account
You can disconnect your WordPress site from your Billsby account at any time by clicking on the 'Disconnect' button', located at the top of the Billsby plugin tab.

Updated almost 5 years ago
