Checkout
Your customers will sign up for plans and create their subscriptions using the Billsby Checkout. You have the option to change what features you want included in the checkout flow, alongside the ability to customize the branding so that it may appear more native to your company's brand identity.
To find out more about the configuration and customization of the checkout experience, refer to our guides on checkout and account management and brand customization.
Here, you will gain a better understanding of what exactly your customers will experience during the checkout flow.
Product selection
The standard checkout journey begins with product selection - you do, however, have the ability to navigate customers to a specific, product, plan or cycle ID in the Billsby Checkout by using our embed code.
The example below, however, demonstrates what the standard checkout journey commences with:
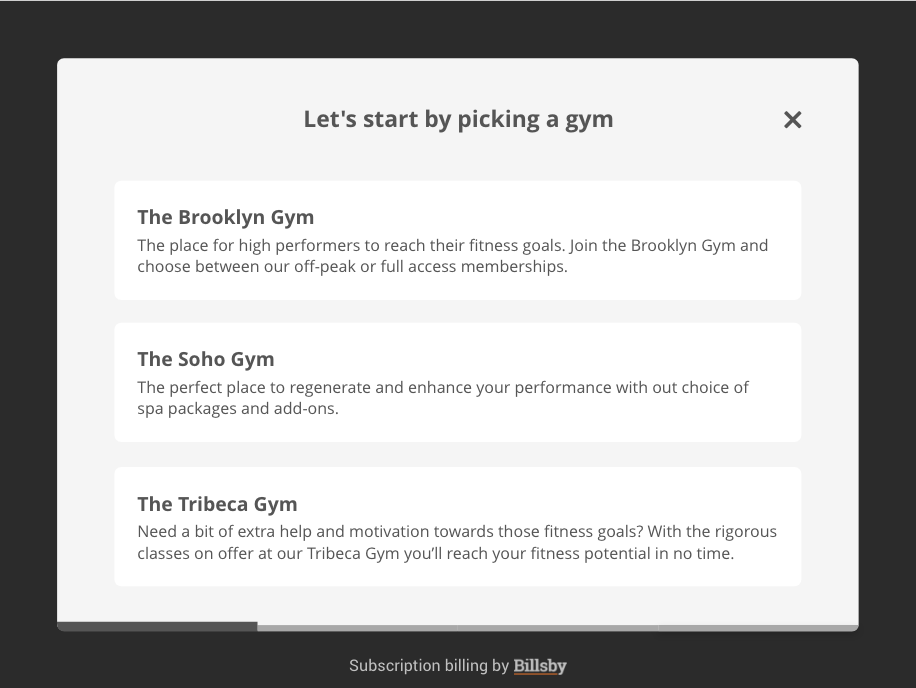
All of your products that have their visibility set to 'Public' will be listed on this screen, alongside at least one plan and cycle with the same visibility settings. These will be listed in alphabetical order, a setting which you cannot change, although you will be able to determine the ordering of your plans and cycles later on in the journey.
Plan and cycle selection
Plan selection
After the customer selects a product, they will be directed to the plan selection page to choose a plan for their product.
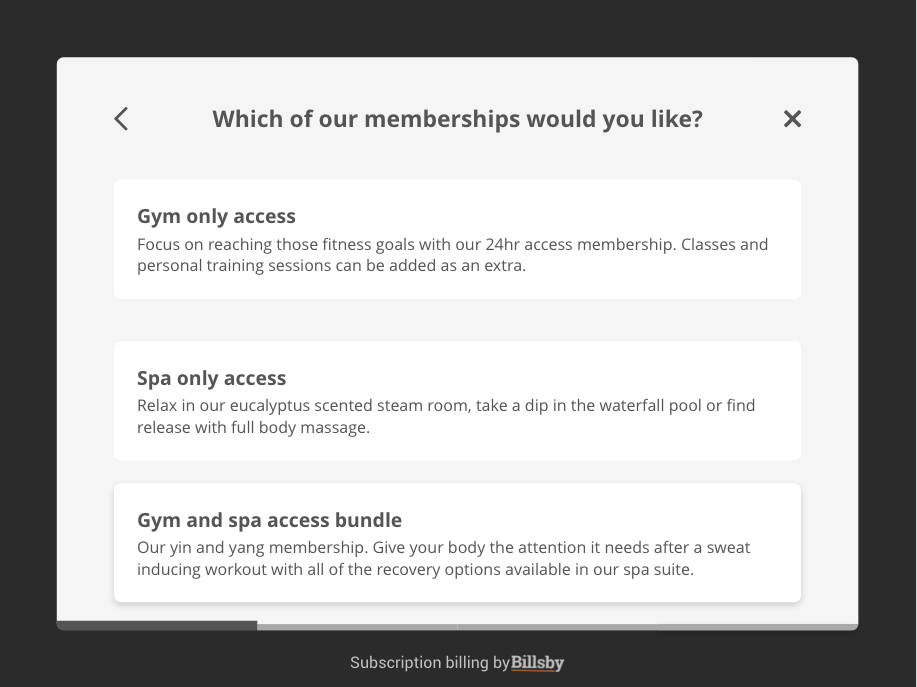
Only plans that have their visibility set to 'Public' that also have at least one cycle linked with the same visibility settings will be shown here. They will be listed in the same order they are listed within the product, which can be found by navigating to the Billsby control panel, clicking Products > Products, Plans & Cycles and clicking on the drop down arrow next to the plan in question.
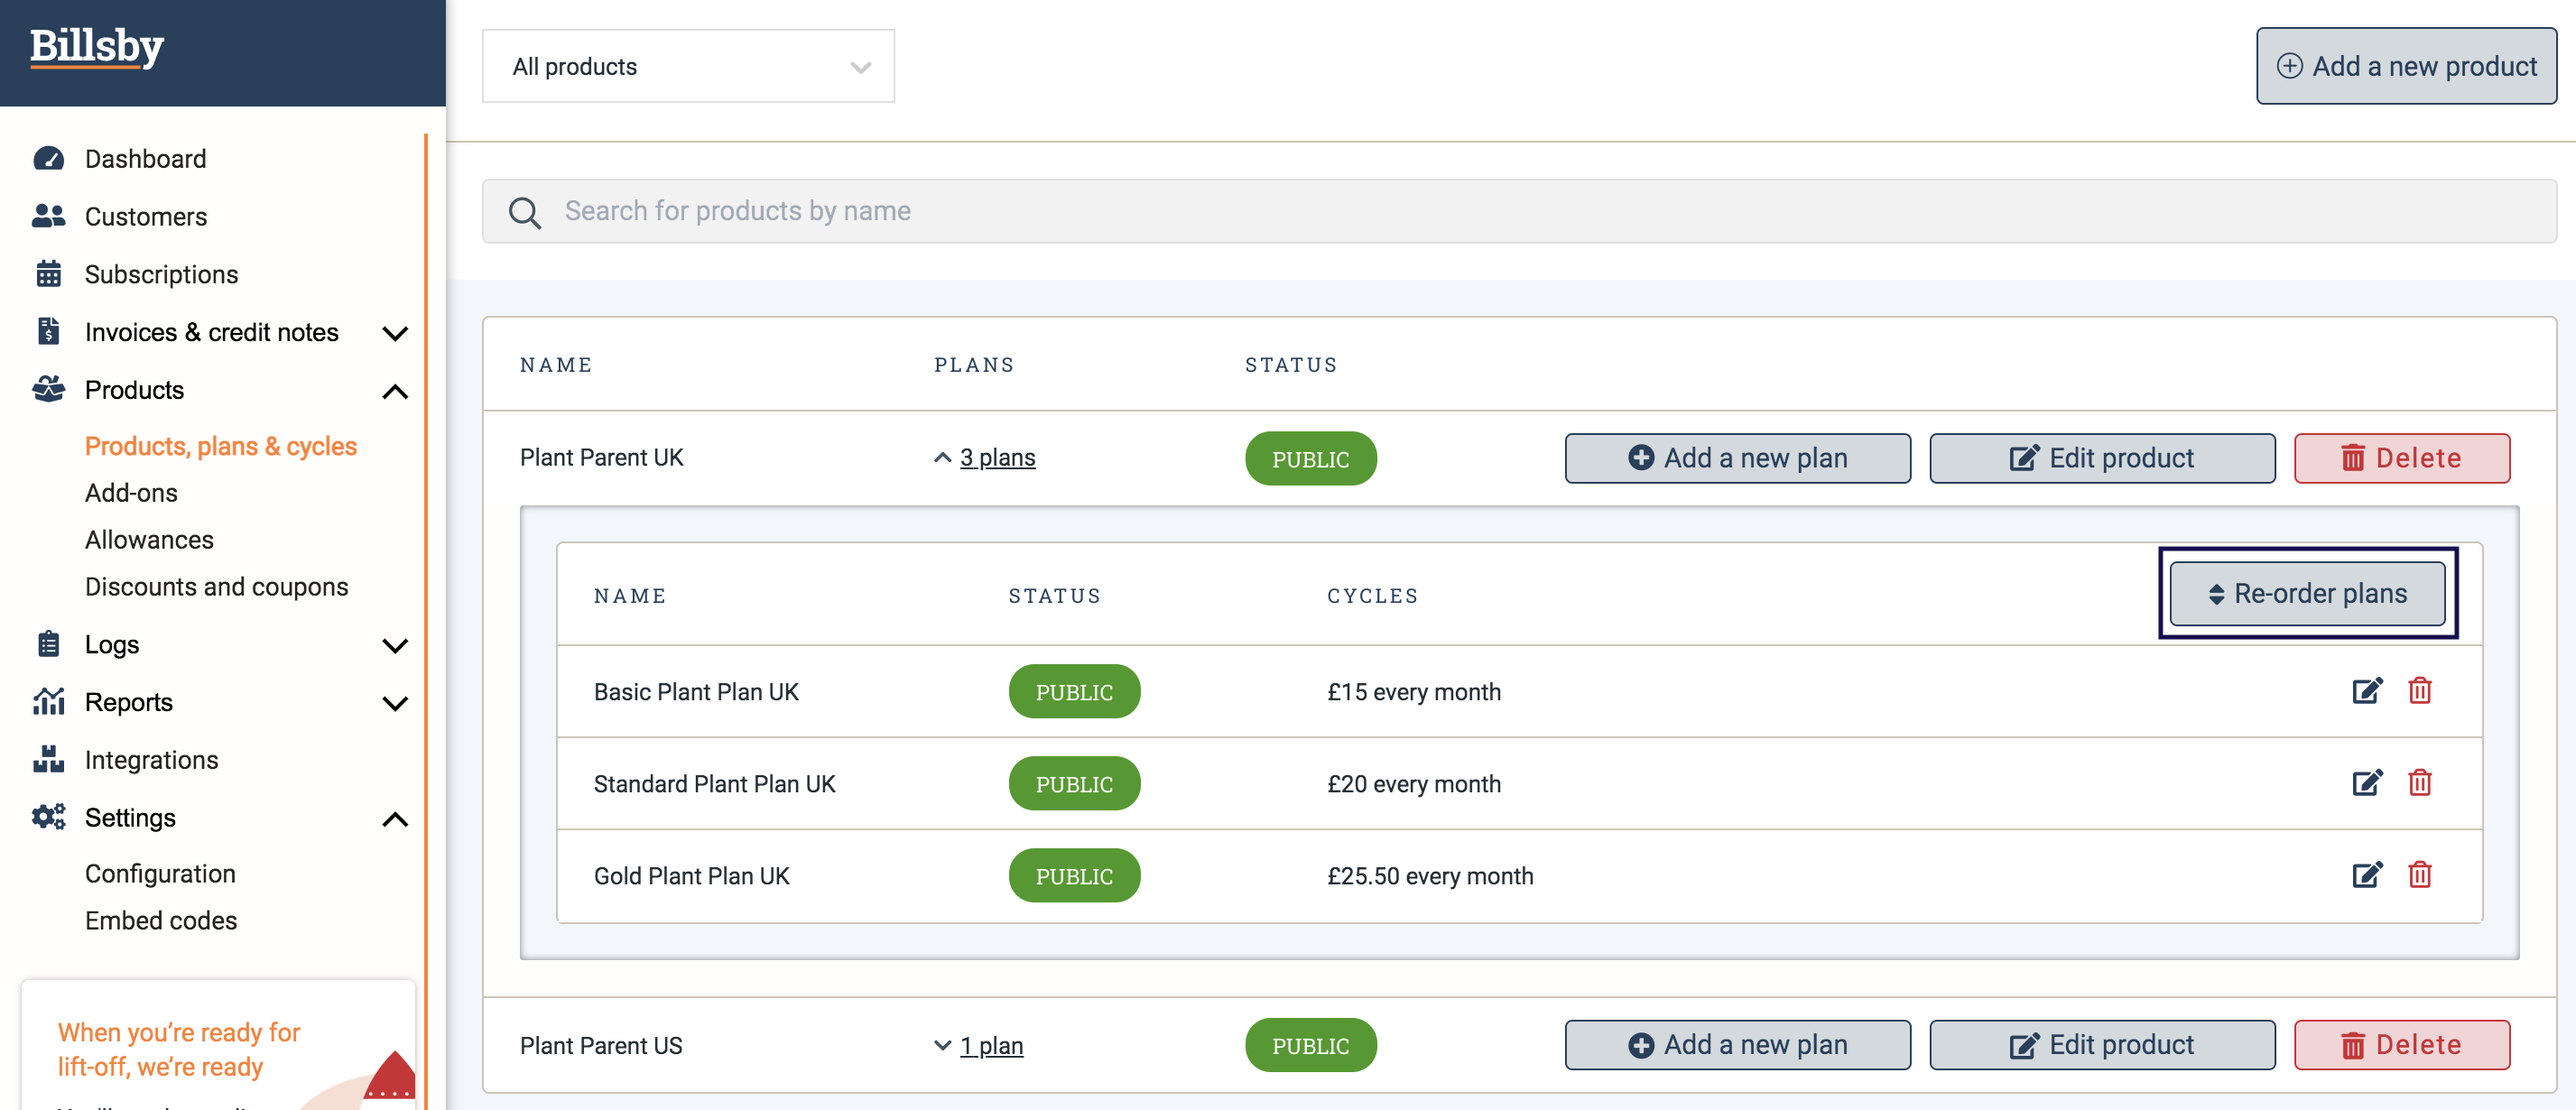
To edit the order in which the plans are listed, click the 'Re-Order Plans' button. This function can be useful for promoting a specific plan or set of plans by putting them at the top of the list. Remember to click 'Update Plans Order' after you've made any changes.
Cycle selection
When a customer selects a plan by clicking on it, the section will expand, allowing them to choose their preferred billing cycle from the drop down menu.
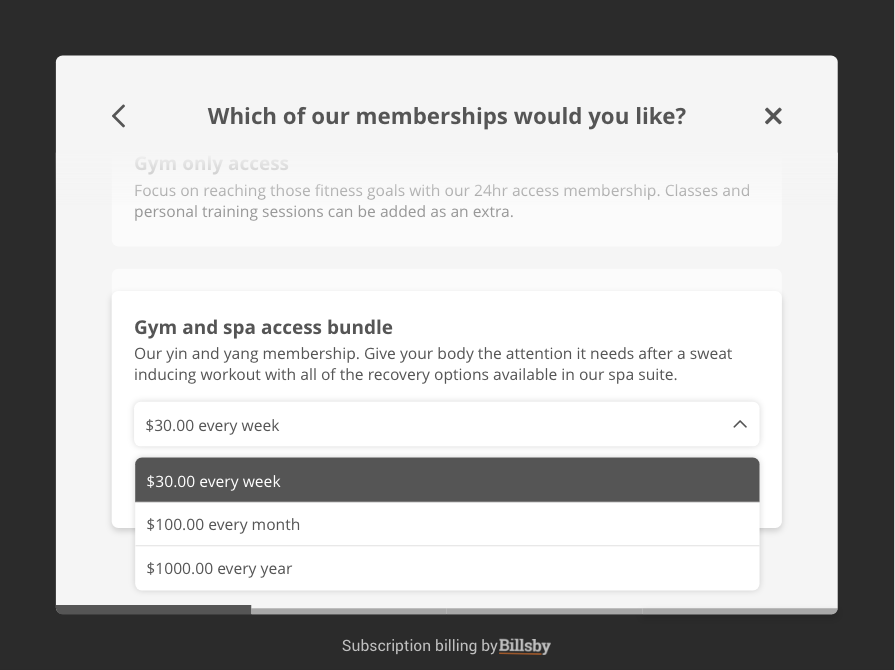
You can also choose the order in which the cycles are listed by using our 'Re-Order Cycles' function within plan creation. Simply navigate to the Billsby control panel, click on Products > Products, Plans & Cycles and click on the edit icon next to the plan in question. Scroll to the 'Billing Cycles' section and click on the 'Re-Order Cycles' button.
Remember to click 'Save New Order' after you've made any changes, followed by 'Save Changes to Plan' at the bottom of the page. The cycle you list first will be configured as the automatic cycle selection when the customer selects a plan.
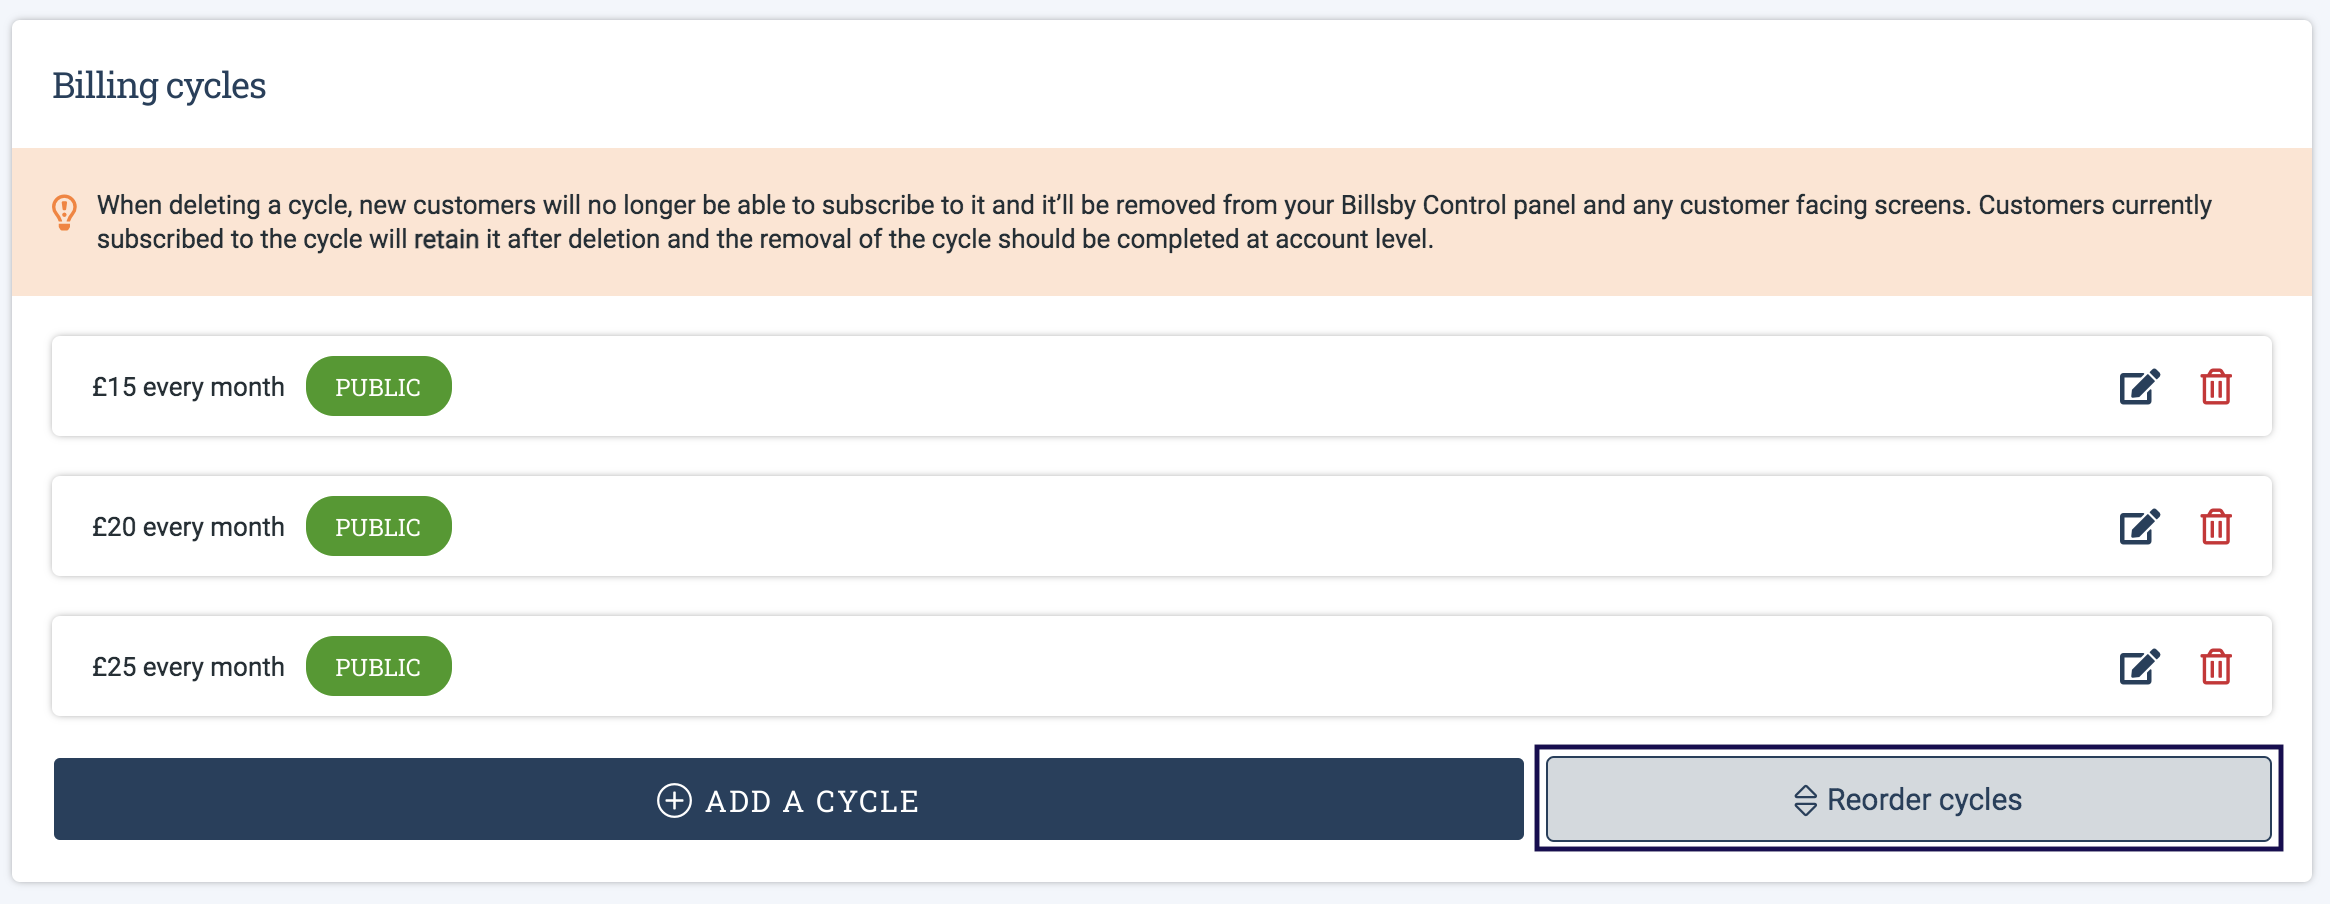
(Cycle re-order function)
Unit based pricing models
In the case of unit based plans, the customer will instead be asked to specify how many units they would like to sign up for, in order to progress to the next step.
Pricing disclosure information will also be shown if your plan has a more complex pricing structure, such as volume, tiered or ranged pricing models. Or, if the cycle includes a setup fee, free trial or minimum term.
Summary cart
Once a customer has selected their product, plan and cycle, we will generate a 'Summary Cart' where they can double check their choices and make any amendments to it before completing the checkout journey.
By default, this feature is turned off. But, if you would like more information on how to give your customers access to a Summary Cart, you can find out how in our Checkout Configuration guide.
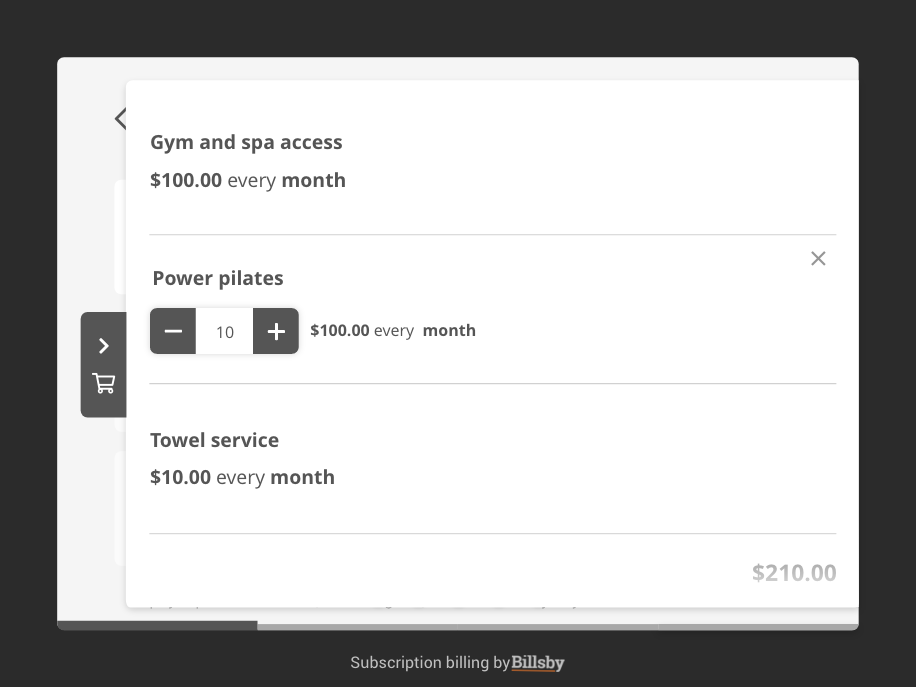
If you set up discounts you can also apply coupon codes within the Summary Cart for easy price estimations. If you choose not to enable the Summary Cart function, however, you can apply coupons in the final step on the checkout flow instead - just before customers are asked to confirm their payment.
Add-on selection
If your customer selects a plan with linked add-ons, they'll be directed to the add-on selection page after they've chosen their cycle.
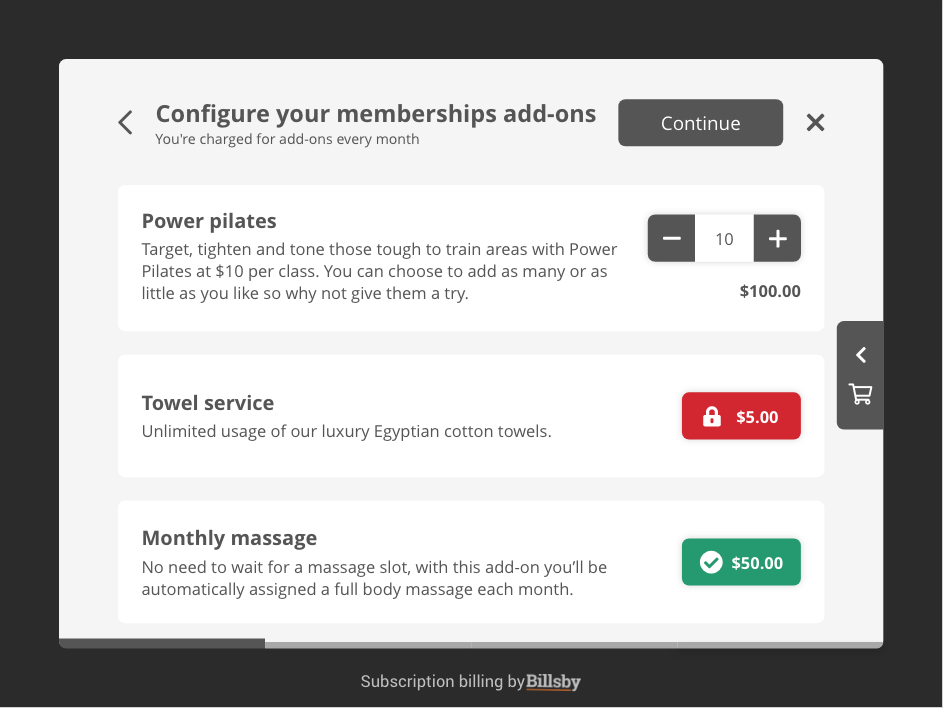
This page will display both forced and optional add-ons. If an add-on is forced with the customer's plan, then they will only be able to interact with it if it's unit based, by selecting the number of units they want included in their add-on.
For optional add-ons, the customer will be able to pick and choose which add-ons they would like to be included in their plan, alongside how many units they'd like to subscribe to (if applicable).
Any add-ons added to your customer's subscription will also be shown in the Summary Cart.
Allowance selection
If your customer selects a plan with linked allowances, then they'll be directed to the allowance selection page after they've configured their add-ons.
If the plan is not linked to any add-ons, then they'll be directed to the allowance selection page straight after they've chosen their cycle.
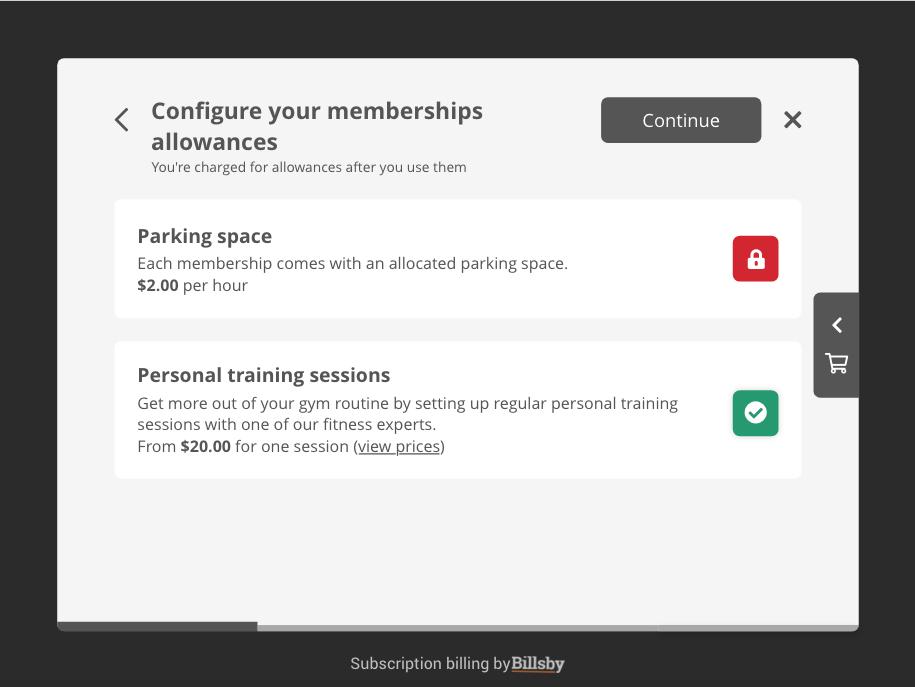
This page will display both forced and optional allowances. If an add-on is forced with the customer's plan, then they will only be able to see its pricing and they will not be able to remove it from their subscription.
For optional allowances, the customer will be able to pick and choose which allowance(s) they'd like to add. Any allowances added to your customer's subscription will also be shown in the Summary Cart.
Details collection - personal, address and custom
Once your customer has created their subscription, we will need to collect the relevant information in order to get their subscription up and running. This includes their personal details, address details, as well as any additional information you may have configured for the product in question.
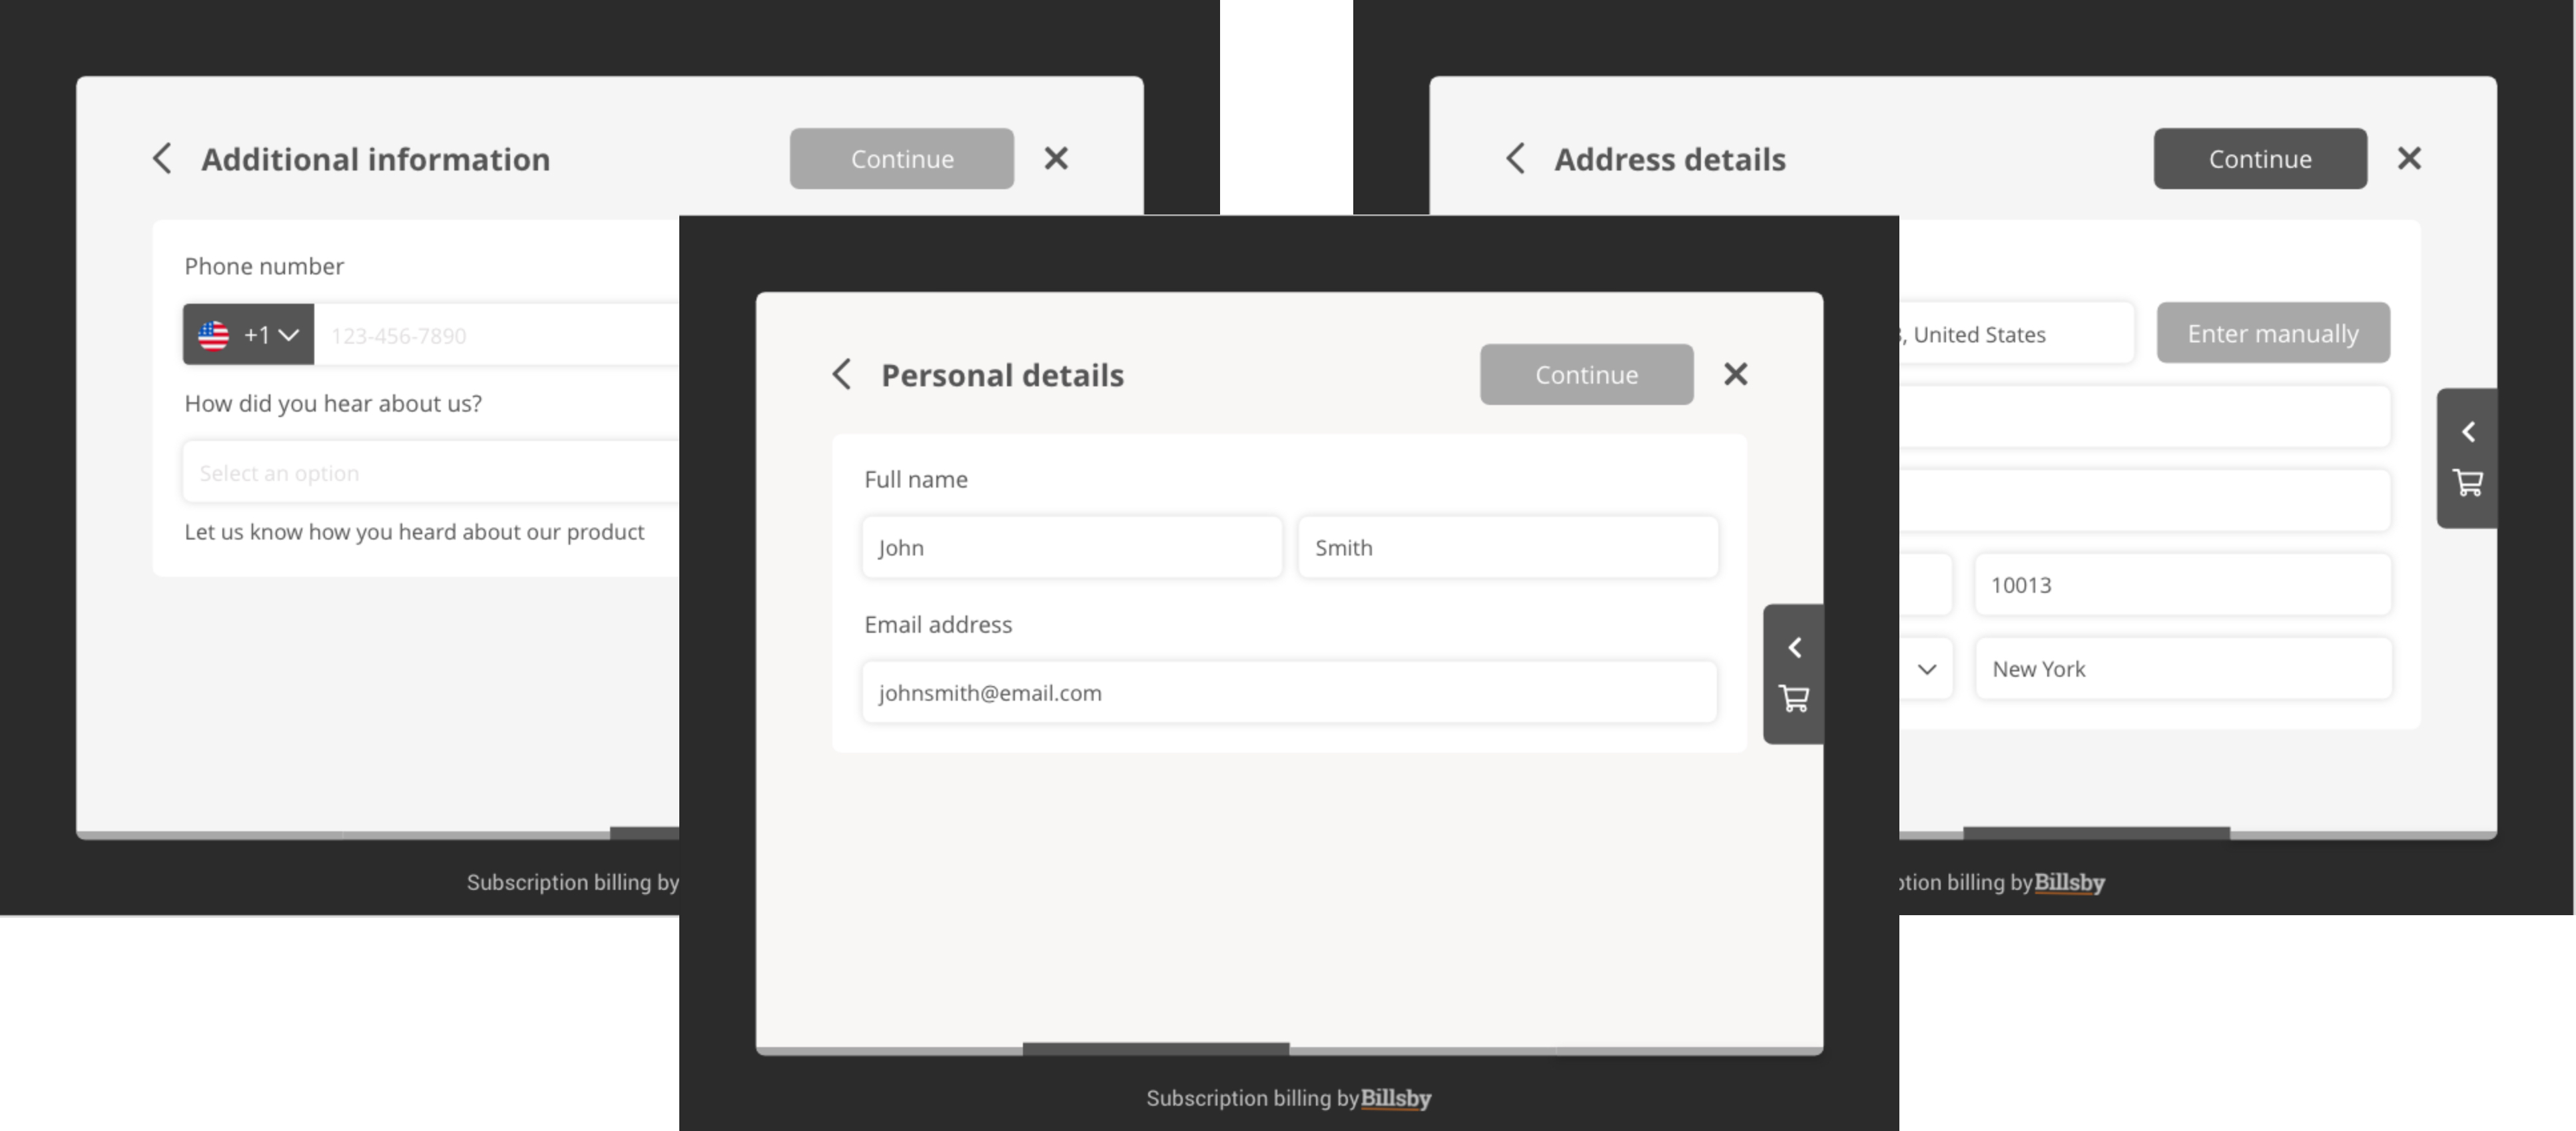
Payment information
The last step of the checkout journey will ask your customer to provide their payment information. Even if their subscription has a free trial period, they will still be required to do this, as the information they provide will be used for all future payments.
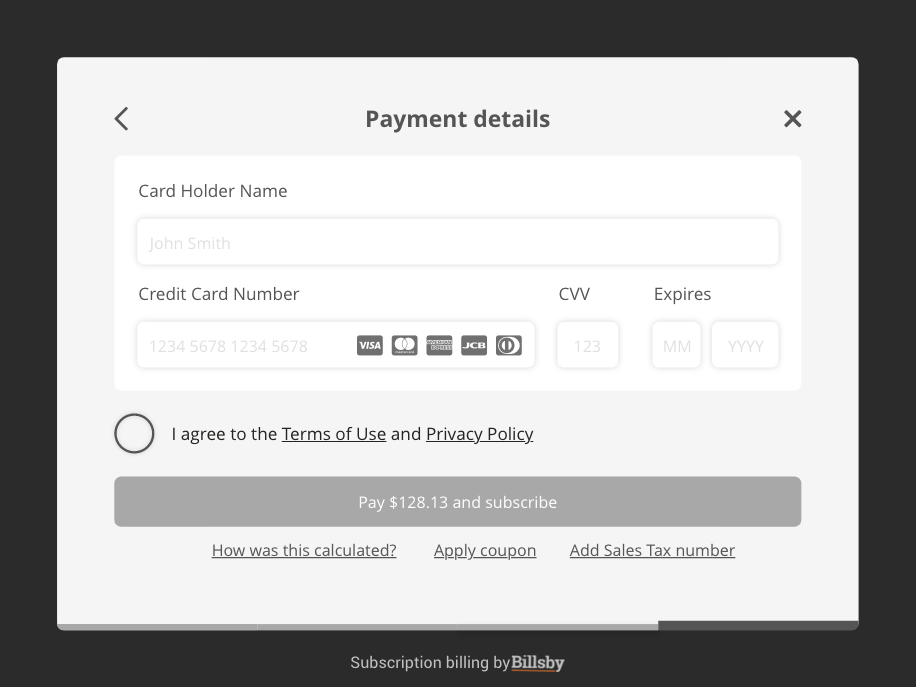
If you choose not to enable the Summary Cart function, you can apply coupons and tax registration numbers on this screen instead. That is, if it's relevant to the subscription they're checking out, of course.
Customers will also be able to access automatically generated pricing disclosure information, detailing what they'll pay on the day as well as how much their regular subscription payments will be.
Confirmation screen
Congratulations you've got a new customer!
After the customer's subscription has been successfully processed, they'll be directed to a confirmation screen and be ready to start using their subscription. To choose a 'Redirect URL' for this screen, head to the Checkout configuration.
Checkout for mobile
The functionality of the checkout journey doesn't end there - we also support the ability for customers to checkout subscriptions on their mobile phone!
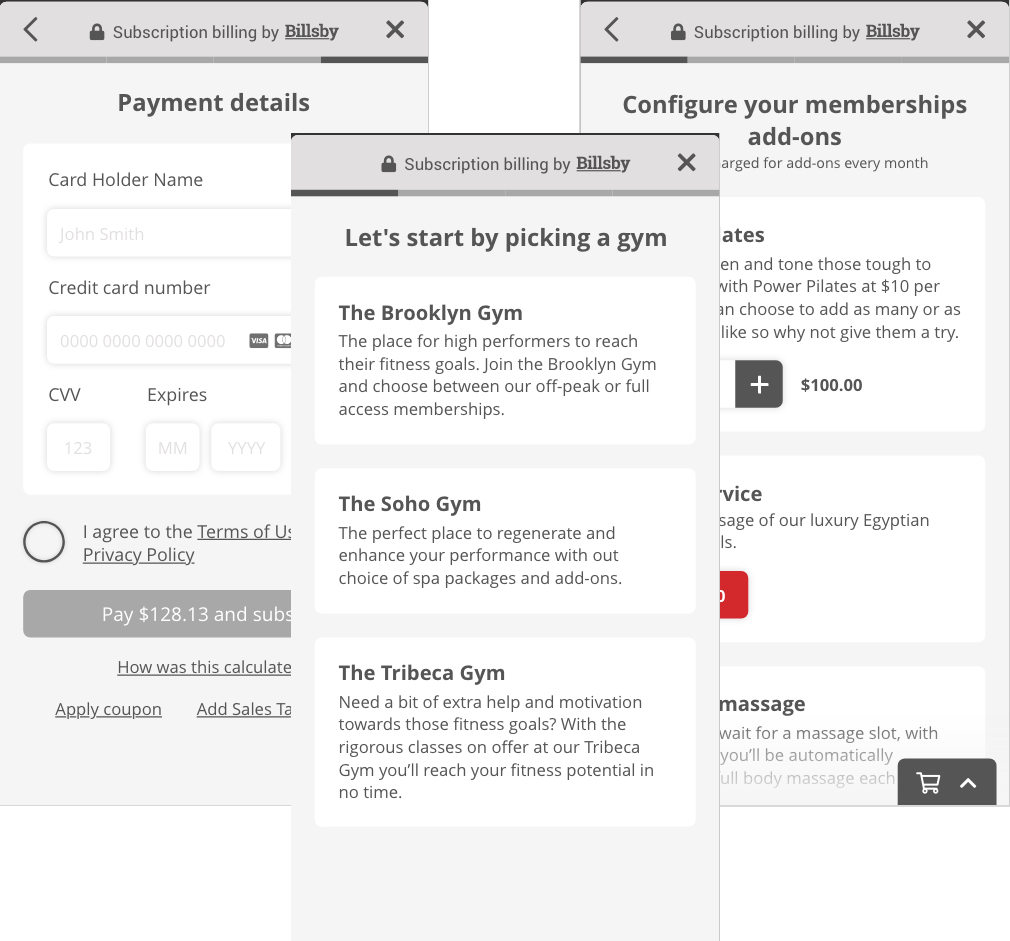
The mobile version of the checkout journey will have the exact same functionality as our web version, and any changes made to your Checkout configuration or brand customization will also be shown on these screens.
Updated almost 5 years ago
